

How To Open Files On Oculus Quest 2
If you've got screenshots, videos, or downloads on your Oculus Quest 2 that you desire to admission or transfer to another device, there are a few ways to do this. Whether you want to transfer the files to a calculator, view screenshots and videos from your Quest 2 on your telephone, or share media to other applications, this article is going to cover exactly how to access files on Oculus Quest 2.
The best way to admission files on your Oculus Quest 2 is to connect your VR headset to a figurer via USB cable. You tin besides sync your media files to the cloud via the Files app on your Quest 2 and access them via the Oculus phone app, or share files directly to Facebook Messenger, News Feed, or Groups.
How To Access Files On Oculus Quest 2
This article is going to provide step-by-footstep instructions for each of the methods for accessing the files on your Oculus Quest 2. I'm going to cover the following:
- Transferring files to a PC or Mac, and how to fix common problems with this.
- Syncing media between your Oculus Quest 2 and your phone.
- Sharing media direct from your headset.
How To Transfer Files On Oculus Quest ii To Your figurer
The quickest way to transfer images and videos from your Quest 2 to a calculator is to connect your Quest 2 to your estimator using a USB cable. This method gives you lot complete flexibility to add or remove any blazon of file from your Quest 2 and gives you lot access to all of the files and folders installed on the device. Information technology is particularly convenient if there are a lot of files that you need to transfer to a computer from your Quest two.
Follow these steps to be able to transfer any files from your Oculus Quest 2 to your reckoner:
- Turn your Quest 2 headset on
- Connect your Quest 2 to your computer using a suitable USB cable. The Quest 2 comes with a USB cablevision with a USB-C connector at each finish, but if your computer only has USB-A connections, you volition need to use an adapter or use a USB-A to USB-C cable.
- Once the cable is connected, put your headset on and click on the Allow button to confirm that yous are happy for your computer to access the files on your Quest 2. Yous tin so remove your headset.
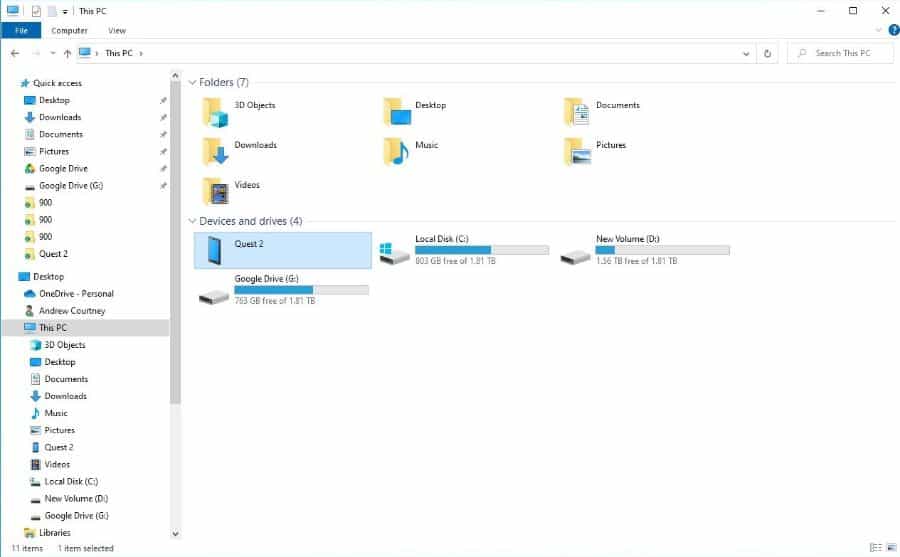
- In windows, open File Explorer, and so navigate to This PC and select Quest 2, which should appear amidst the list of other drives and connected USB devices.
- If you are using a Mac, y'all volition need to download and install Android File Transfer to let you lot to access the files on your Quest 2.
- Once this is installed, you can open up Android File Transfer to admission and transfer files from your Quest ii.
- Screenshots and videos are stored within the Oculus folder, which contains a separate binder for screenshots and video files.
What To Do If Your Oculus Quest ii Is Not Showing Up Equally A Drive When Connected To A Computer
Ane of the most common problems you lot may experience when you lot connect your Quest 2 to a reckoner is that information technology doesn't show upwardly as a drive. There are several ways to set up this.
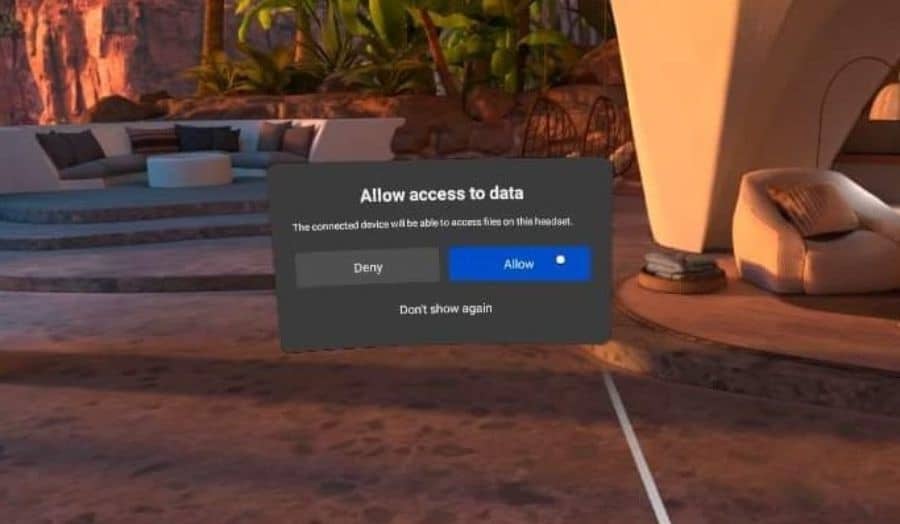
1. Make Sure To Click "Allow Admission To Data"
The commencement matter to do after connecting your Quest 2 to your figurer is to put your headset on and click Permit on the "Allow Admission To Data" notification box that appears. DO Non click on "don't bear witness this again" as this will prevent your Quest ii from being detected in the hereafter when connecting to your computer.
You must click on the Allow push every fourth dimension y'all connect your Quest 2 to your computer to transfer files. If you forget, or if in that location is no USB connection dialogue, and then your Quest 2 device will non show up on your computer when you connect information technology and you will not be able to access files on Oculus Quest 2 in this way. See the solution beneath to fix this problem.
ii. Enable The USB Connection Prompt
If you have previously continued your Quest 2 to a figurer and instead of clicking on the Permit Admission To Data push button, you clicked on the "don't prove this again" choice, your Quest two volition no longer connect to your PC when yous link them with a USB cable.
This can be fixed easily, only it's more difficult than information technology should exist. There is no simple option on the Quest 2 to restore this dialogue box unless y'all have enabled Developer Mode on your Quest two. The solution to your problem is to enable Programmer Mode, and so y'all tin can hands restore the power to connect to your figurer with a USB cablevision.
- Switch off your Quest 2 headset.
- Go to the Oculus programmer website and sign up for a developer business relationship. This simply takes a minute to exercise.
- You can log in with an existing Facebook account to accept a merged account, or create a new standalone account. I would recommend using the Facebook business relationship you are using on your Quest two if possible.
- All you need to do is to add a telephone number or credit card to verify your account and add a few brief details to set up your programmer business relationship.
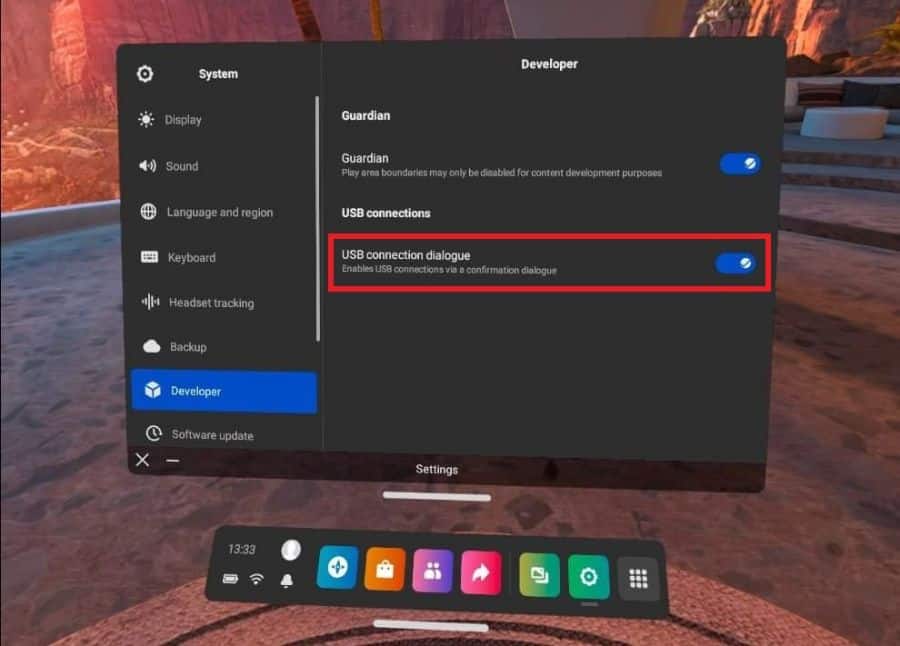
- You tin can then restart your Oculus Quest two, navigate to the Settings app, and select System.
- Click on the new Developer option that y'all will observe and click on the push button next to the USB connectedness dialogue setting.
- Yous can now connect your Quest 2 to your computer and you volition come across a USB connection dialogue box on the headset. Click Allow and your Quest two volition show upwardly every bit a USB drive on your computer, allowing you lot to access files on Oculus Quest 2 again.
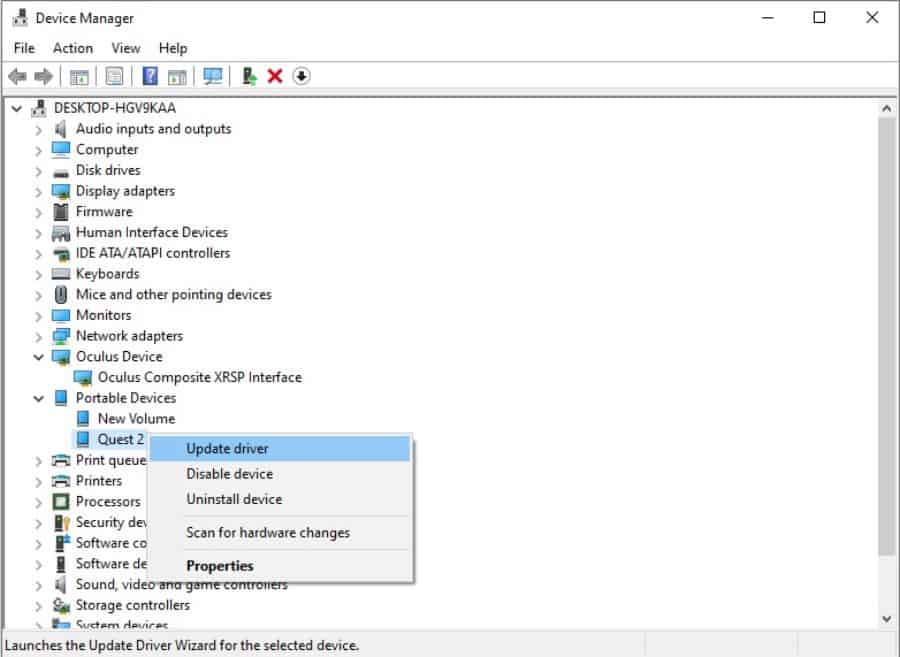
three. Update The Drivers If Oculus Quest 2 Is Not Showing Upwardly When Connected To A Estimator
The other possible crusade is that your Oculus Quest ii is non being correctly detected equally a USB mass storage device, and this is usually due to the drivers not being installed, or requiring an update or repair.
- Connect your Quest 2 to your computer via USB cable.
- Click on the Start Menu and type "Device Manager" and click on the application of the same proper name.
- Look for Portable Devices and click on this to expand.
- Right-click on Quest 2 and select Update Driver.
How To Transfer Photos From Oculus Quest two To Your Phone
The best way to transfer photos and videos from your Oculus Quest 2 to your phone is to use the media syncing characteristic on your headset. This will sync all screenshots and videos that y'all take with your headset to the Oculus app that you lot should have on your phone.
Hither's how to set up media syncing on your Oculus Quest 2:
- Afterwards putting your Oculus Quest ii headset on, printing the Oculus push button on your right controller to access the toolbar.
- Select the App Library icon from the right side of the toolbar
- Now select Files from the App Library
- You volition at present take the option to view the files on your headset and can browse downloads, media files, and recent files, also as view the individual folders on your headset.
- Y'all will see a cloud icon in the pinnacle right corner of the Files app that allows yous to plow on deject syncing. Once y'all click this, all the media files on your Oculus Quest two volition be backed up to the deject and you tin access them via the Oculus app on your phone.

- Open the Oculus app on your phone and select the Gallery tab at the bottom of the screen. Y'all will at present see all of the media files that are on your Quest two.
- Yous can at present click on each one and use the Share button in the acme right corner to share this file in a number of means. My personal preference is to share it with the Google Photos app as this is where I tend to store all my photos and videos.
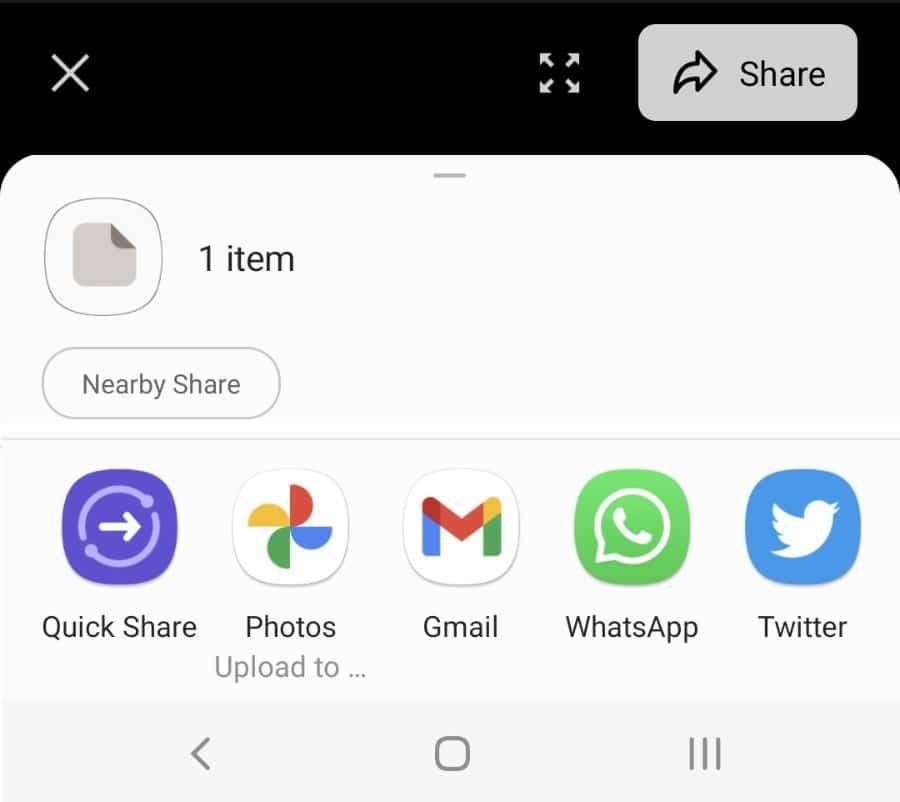
Unfortunately, there does not appear to be a way to share multiple files at once, and you tin can not download the files directly to your phone.
How To Transfer Files To Oculus Quest 2 Wirelessly
Although there is no native functionality to transfer files wirelessly from your phone or reckoner to the Quest two, in that location are a number of very simple means to make this work easily. The best option is to use a deject file-sharing service to fill-in your files from your phone or calculator, which y'all can then access via the browser on your Quest ii.
Here is the procedure I use to transfer files to Oculus Quest 2 wirelessly:
- I use Google Drive and Google Photos to back upwards my videos, photos, and files from my phone and computer. Once the files are backed up, I tin access them on my Quest 2 via the browser.
- Open the default net browser on your Oculus Quest 2.
- Navigate to the Google Photos or Google Drive website.
- Log in with your username and password.
- You tin can then view or download any of your files straight to your Quest 2 headset.
How To Access Downloaded Files On Oculus Quest two
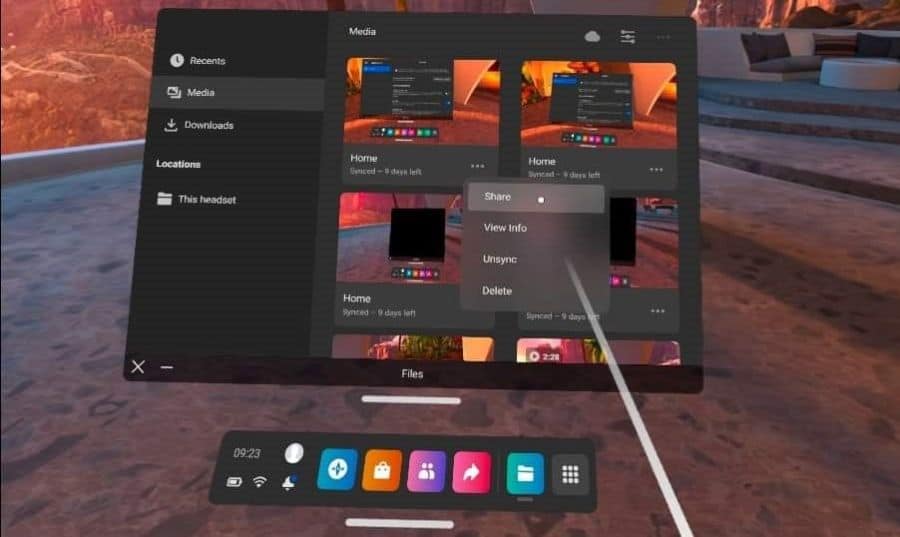
In one case you lot accept downloaded files onto your Quest 2, they can be accessed by opening the Files app in your App Library. Click on the App Library icon on the correct side of the toolbar that appears when you press the Oculus button on your right Quest 2 controller.
Select the Files app, and you will then see an option on the left labeled Downloads where you can browse through all of your downloaded files.
How To Share Files On Oculus Quest 2
You tin can direct share files from your Oculus Quest 2 to your Facebook News Feed, Groups, or to Facebook Messenger. You tin can do this by clicking on the Sharing button on the toolbar or by accessing the Files app.
Click on the file you desire to share and and then select the sharing icon in the top right corner. Y'all will exist given the option of where y'all want to share the file to. Y'all can only share images and videos in this mode, but not downloads or other files.
If you desire to share files to another location, you can sync the files on your Oculus Quest 2 with your Oculus app, or transfer the files to your reckoner using a USB cable, enabling you to access files on Oculus Quest 2 and use them how y'all like.
How To View Oculus Quest 2 Recordings On Your Phone
The best fashion to view Oculus Quest ii recordings on your phone is to link your Oculus Quest 2 to the Oculus smartphone app, and then enable file syncing on your telephone. Once you lot exercise this, all video recordings yous make on the Quest 2 volition be backed up to the cloud and you can then view them on your phone via the Oculus app.
You tin can besides share the recordings to multiple different destinations, giving y'all considerable liberty to utilize the recordings how you want.
Go to the Files app in the App library on your Quest two and toggle the cloud syncing icon in the acme right of the screen. As long as you are continued to WiFi, your Quest 2 will immediately start syncing your media files to the cloud. Once syncing is consummate, yous tin can access them via the Oculus app.
Open your Oculus app and select Gallery to view all of your synced media files. You cannot download the files direct to your phone, but you lot can share them with a broad range of apps and services.
Source: https://vrlowdown.com/how-to-access-files-on-oculus-quest-2/
0 Response to "How To Open Files On Oculus Quest 2"
Post a Comment